
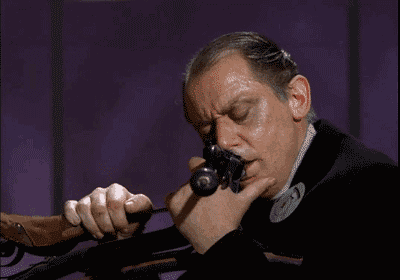
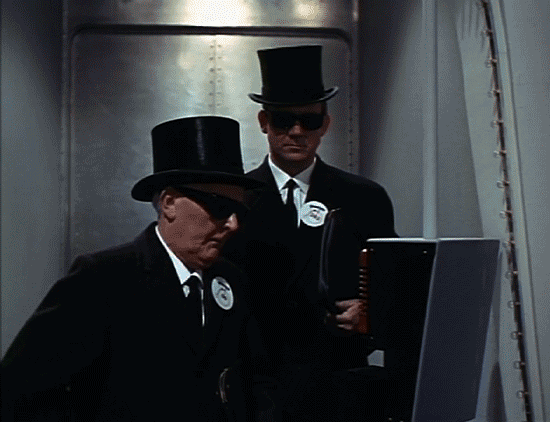
Christina’s original “Number Two as Anvil” GIF (1.5 MB) by @clhendricksbc
Masked, saved with 32 colours, Perceptual index (478 K) by @aforgrave
Making GIFs from scratch can be somewhat of an arcane Science at times. While there can be a good number of strategies to which one can turn to decrease file size, there is always a point at which the Art begins to suffer. While a smaller GIF may be desirable (if only as a challenge — high speed broadband makes the original intent somewhat moot), there is a point at which the reduced dimensions, or reduced colour depth, or the reduced number of frames introduces too much compromise and your GIF starts to look like crap. There is an interesting documentation outlining some of this in Tina’s post “@Tumblr, Meet Me at the Stairs,” where she attempts a number of different approaches to getting her GIF to post on Tumblr.
Having said that, it’s always nice to be able to optimize a GIF and still have it say what you want it to say.
Initial Strategies: Dimensions, Number of Frames, Colours
So when Christina (@clhendricksbc) posted her GIF of Number Two and the Penny Farthing this morning (first image, above), there was an immediate impulse to respond to her attempts at decreasing the file size when she said, ‘So it’s 1.5 MB as is, which isn’t too bad.”
Christina had already made 3 attempts at compromise:
- she reduced the dimensions of her image to 400 pixels (wide) by 280 pixels high;
- she reduced the number of frames (sometimes there are duplicates which can be deleted);
- she adjusted the colour depth/indexing of the GIF.
All of these approaches can be viable options to apply when looking to reduce the size of the GIF. And each of the three, if taken to the extreme, can take your GIF out of the realm of Art and reduce it too far.
- make the dimensions too small, and people can’t see the detail;
- remove too many frames, and you lose the nuances and distinctions that individual frames provide;
- reduce the colour depth too much, and you get banding, blotches, washouts, and a generally poor quality image.
Another Strategy to Try: Masking
In looking to decrease Christina’s file size from 1.5 MB, there was one as-yet-untried strategy can make all the difference in the world. Note that it does not always result in significant file size reduction — it depends on the nature of the image being animated.
Christina’s Number Two and the Penny Farthing GIF is an ideal candidate for masking, as it features a fairly large area which does not change from frame to frame.
If you study the GIF above you will see that the movement is limited to Number Two’s hands and his face. The significant purple curtain behind and his jacket/sleeve represent an unchanging area, that if only referenced once, makes for a much smaller GIF.
Consider the following:
- Imaging keeping a large part of the GIF static.
- Poke a hole through the static image where the movement from the other frames needs to show through.
- Let the frames cycle behind the mostly static image, so that the only parts that change from frame to frame are the small bits that show through the window.
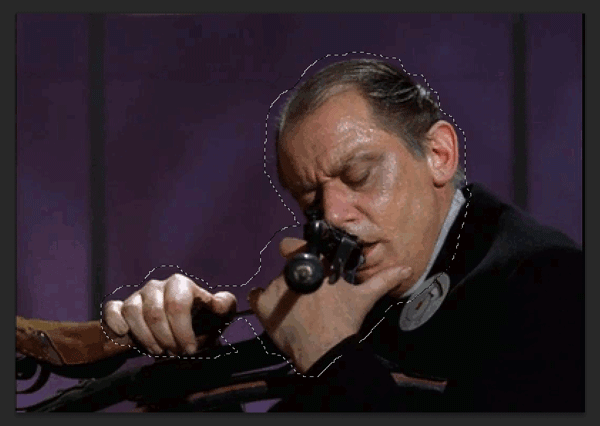
“Making a Mask” animated GIF by @aforgrave
To accomplish this, you study the frames to identify where you want to retain motion. If you compare the two GIFs at the top, you will see that I have made the decision not to retain the movement of the bicycle saddle — the hands and the face tell a story, the moving seat is not so important.
- Select the area you want to isolate — use a selection tool like the lasso
- Use Select>Inverse to select everything BUT what you want to remove.
- Use Layer>New Layer via Copy to create a new layer which forms a static foreground and place it at the top of the stack. By default it will be toggled on to display in every frame.
Now save the GIF again, and voila, an instantly reduced file size.
Notes:
- If you err on the side of caution (make the initial selection smaller rather than larger) you can always erase bits of your top layer if you need a little bit more motion to show through.
- If you make the hole too large, you can always delete that layer and make new common layer to replace it. You are not changing your existing layers, only duplicating part of one to use for all.
- If you have varying qualities in the image of the frames from different layers), choosing a really good quality layer to use for your mask suddenly promotes the good quality throughout the whole GIF.
- In some situations, you make find it valuable to create a composite mask from two or more layers so that you eliminate distracting movements that are not central to your GIF.
- The counterpoint to creating a masking layer is to create a common background, and then animate small portions of your image in front. This also results in a reduced file size.
Try Masks!
Working to understand and make use of masking in your GIFs can really open up a number of possibilities — not only for reducing file sizes, but also for increasing the quality and uniformity of your GIF across the frames. If, in emphasizing part of an image, you eliminate distracting movements in other parts of the image, you are helping to focus the viewers attention –and that can better help to tell your story.
In exploring Christina’s question, I have also started to extend my limited understanding of the options provide by different kinds of indexing. Rather than share that here, I will create a separate post where that can be the focus.
#BeSeeingYou


Wow, Andrew, this is fantastic! So helpful, and so much easier than I imagined. Thank you! Bookmarking this for future reference.
What I don’t get is how it would be that adding one layer would make for a smaller file size. There are still the same number of layers (actually, one more). Is it because the gif format only saves what is moving from each layer, and you’ve reduced that with the mask?
Christina!
I’ve found some fun reading from 1996 (around the time animated GIFs became a thing and around the time I joined the web) which I’m hoping will help me to better understand exactly what is going on. But my understanding for some time has been that one feature of the GIF is that it only changes what it needs to in moving from one frame to the next. So the more times one pixel stays unchanged, the smaller the file. I’m reading the article linked above right now.
How wonderful! I love learning something else I can try to play with for the size issue. Thanks so much Andrew for explaining so clearly and offering something that is much more than technique: a generative heuristic to help me work with the format and keep size down without losing the aesthetics. Knowing that: “the GIF is that it only changes what it needs to in moving from one frame to the next” may help me decide what to edit and how!
Look forward to reading the article and trying this out once I rested a little from my terrifying time finding the terminal room in the tunnels underground. [actually I was working in Birmingham ;)]